How I Created an In-Person Workshop Keynote with No Experience
Watch the full video where I explain the detailed process of creating my social media course, from concept to delivery. Learn how to structure your own workshop and engage your audience effectively. WATCH VIDEO ON YOUTUBE
Disclaimer: This post may contain affiliate links that provide a small commission at no extra cost to you. Your support helps me continue creating valuable content for you.
How I Created an In-Person Workshop From Nothing!
I did this last month. Here’s a step-by-step breakdown of how I did it, from concept to presenting to follow-up.
1. The Idea
I was approached to create a social media course for makers at a local makerspace.
I said, “yes.”
This got me thinking about the essentials for getting comfortable putting yourself out there, building an authentic audience, and growing a following you actually enjoy interacting with.
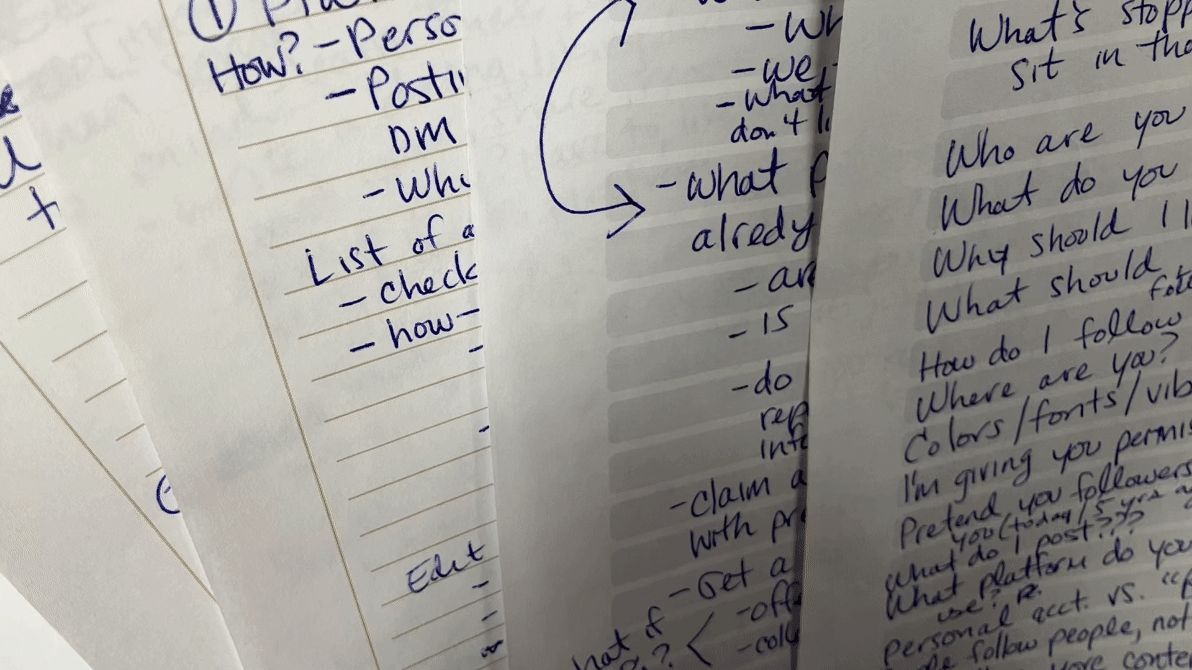
A peek into my initial brain dump notes where I jotted down all the essential tips and strategies for social media success. This is the raw, unfiltered foundation of my social media course for makers and creators.
I started with a brain dump, listing everything I’d tell someone new or stuck on social media. These ideas, not in any order, eventually became the content for the course. This took me about a week to get all out of me. There was a lot.
2. Organizing the Chaos
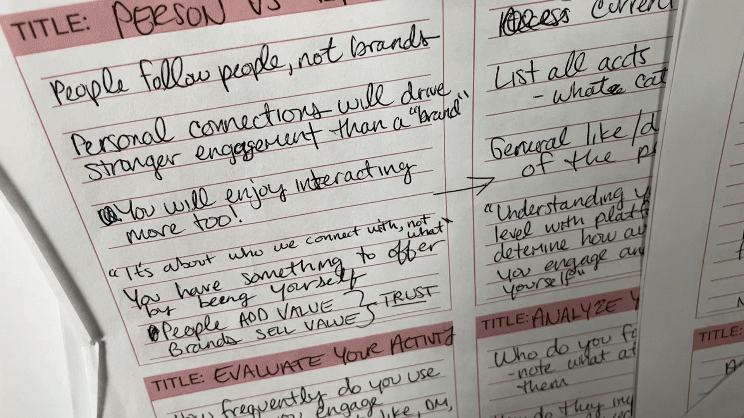
I grouped similar ideas from the brain dump together, finding common topics and categories. This wasn’t about final order but organizing thoughts.
I condensed and revised the ideas, adding missing points and removing redundancies. And adding new ones.

Organizing my brain dump into coherent topics and categories. This step was crucial for creating a structured framework for the social media workshop.
This created a framework for the course, but it still was scattered and missing connections.
3. Structuring the Course Outline
With topics categorized, I put them into a rough order for the presentation. I aimed for thirty slides, each lasting about three minutes.
I listed thirty bullet points, each representing a key topic. This helped me balance the content and ensure a solid foundation.
Transforming the categorized topics into detailed slides. This is where the course content started to take shape, ensuring each key point was thoroughly covered.
This is when things started to come together and I could see it in my mind’s eye.
4. Creating the Slide Layout and Workbook
I revised and tweaked the order again. I created a detailed layout on many sheets of paper, giving each bullet point space below for additional content.
I pulled relevant details from my previous brain dumps and revisions to flesh out the details I wanted on each slide. Each slide then became a rough draft of content.

Screenshot of the social media course workbook created in Adobe Express. This workbook serves as a companion resource for attendees, providing additional exercises and insights.
I took this and created a workbook for the attendees to do further work. I used Adobe Express for this.
5. Fine-Tuning and Rehearsal
Building the workbook helped me understand the flow of information better. I reordered slides and workbook pages to ensure logical progression.
Before making the slides, I did a rough rehearsal. I recorded the audio and vamped on each slide topic without constraints or time limits.
This allowed me to refine the presentation and make necessary tweaks in the moment.
6. Creating the Slides
Using the rough draft, workbook, and rehearsal transcript, I created the slides. Each slide reflected the planned discussion and complemented the workbook.
This ensured a correlation between what I was saying and the homework materials, maintaining a flow.
7. Final Rehearsal and Refinements
I did another rehearsal walkthrough, recording myself to review my performance. This provided insights into eye contact, body movements, and presentation style.
I noted additional points and errors, making necessary tweaks. I never wrote a script. I used cues, my slides, and a printed out copy of my workbook to keep me on track.

A behind-the-scenes look at a still from my rehearsal recording. Practicing the presentation helped refine the content and delivery, ensuring a smooth and engaging workshop experience.
By the end of the rehearsal, I had a presentation. I was confident with what I had to say and was ready to go.
8. Preparing for the Course and Onboarding Attendees
With the presentation ready, I set up my website to onboard attendees.
I created a course page with lessons, a place to upload the workshop replay recording, and to access the workbook download. I use Squarespace for this.

A screenshot of the Squarespace courses page during the creation process. This platform made it easy to set up lessons, upload materials, and streamline the onboarding process for attendees.
Attendees could easily sign up for the course on my website using a special coupon code given on the day. This allowed them to access the workbook and revisit the presentation anytime.
9. Presentation Day – Lessons Learned
I ensured I had all necessary equipment and backup devices. The presentation was streamed as an online webinar, allowing in-person and virtual attendance.
Despite meticulous preparation, I learned some hard lessons:
A foolproof audio setup.
Allowing time for questions at natural breakpoints.
Make a list and double-check everything.
These lessons will improve my future presentations.
10. Delivering the Presentation and Handling Questions
During the presentation, I followed the plan of three minutes per slide. The intro slide included the title, website link, QR code, and coupon code.

Presenting the introductory slide with a QR code and coupon code for easy access to the course materials. This slide was designed to streamline the onboarding process for workshop attendees.
Attendees had many questions, highlighting the need for mid-presentation Q&A breaks. This adjustment will make future keynotes more interactive and enjoyable for everyone.
11. Post-Presentation Engagement and Onboarding
At the end of the presentation, I made sure to allow plenty of time for questions from attendees who were actively interested and curious. I stayed available and didn't rush out, which proved helpful as several people had numerous questions.
To encourage onboarding, I emailed the attendees who left quickly, reminding them that the workbook was free with the provided coupon code. I also offered my personal assistance for any questions or further connections. This follow-up helped onboard about half of the attendees, which was a promising start.
Next, I focused on getting the presentation materials uploaded to the course page on my website. Once everything was in place, I notified the attendees that the replay was available and reminded them about accessing the workbook. I reiterated my availability for any questions they might have.
Lastly, for those who signed up on the email list, I organized a live Q&A session. This provided an additional opportunity for attendees to engage, ask questions, and further benefit from the course material.
Join my upcoming live Q&A session where I’ll dive deeper into authentic social media strategies and answer all your questions in real-time. Don't miss out on this interactive opportunity to enhance your social media skills and grow your online presence. WATCH ON YOUTUBE
Shout out and a big thank you to Sue Bryce and her Content Curator course that gave me not only to tools I needed but empowered me to do it with unshaking confidence.
Upcoming Livestream
Join me on my upcoming livestream and ask your questions LIVE! I’ll dive deeper into authentic social media strategies and answer all your questions. I hope to see you there!
Ways to watch…
Bookmark the Live Page on My Website and Get Notifications to Your Inbox
A Great Website is a Hub for Your Social Media Followers
For anyone looking to create a similar online presence for their business, please reach out for a consultation! My experience in web design and ability to select the perfect tools for each client's needs are my specialty.

15 Minute Consults
Let’s chat on the phone and figure out the best direction for you.
For the DIYers…
If you're interested in learning how to make your own stunning Carrd website, try my extensive video library! By signing up, you'll be given immediate access to this comprehensive tutorial videos and workbooks to building a Carrd website on your own.
This library is filled with step-by-step videos, exclusive livestreams, resources, and inspiration to help you grow your online presence.
All-Access Website Design & Video Library Membership: $299/year
Become a Member and Enjoy:
Exclusive Video Content: Gain access to members-only videos that dive deeper and provide step-by-step walkthroughs for Squarespace, Carrd, and Shopify. Constantly updated.
Early Access to New Content: Members will have the privilege of viewing my latest content. Whether it's a brand new feature or an update to an old one, you'll be the first to see it.
Members-Only Livestreams: Participate in exclusive, bi-weekly Q&A livestream events, where you can connect with Cate and other like-minded individuals in the chat as we discuss updates, changes, or anything related to the Website Video Library. Ask your questions, network, collaborate, and share experiences.